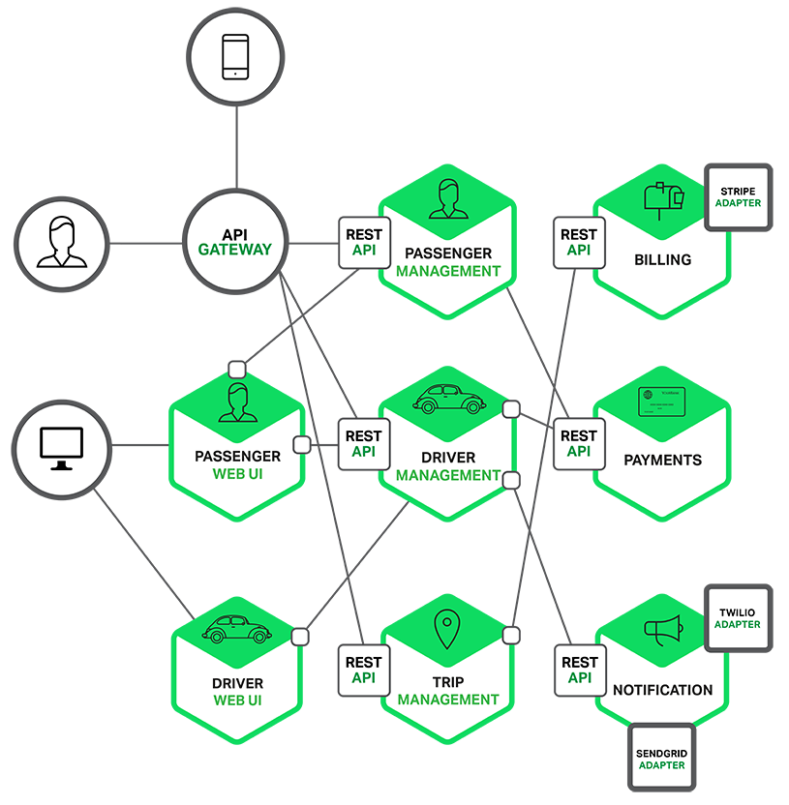
Mục đích bài viết này tôi sẽ chỉ bạn một cách nhanh nhất xây dựng một microservice trên Phalcon, sau đó kết nối microservice thông qua REST API.
Bài toán đặt ra
Khi người dùng gửi một hình ảnh thì hãy cho biết hình ảnh đó có kích thước, màu sắc, là động vật hay con người, là nam hay nữ, là hình ảnh người lớn hay không… Khá là hợp với các ứng dụng mạng xã hội, và thật ra tôi cũng đang làm dự án mạng xã hội thú cưng nên tiện thể chia sẻ cách làm luôn, học tới đâu viết bài tới đó phương châm của tôi là vậy.
Giải quyết vấn đề
Sau một hoài tìm kiếm trên google thì có 2 sự lựa chọn đó là dùng API Vision của Google hoặc M$, vì mục đích của mình là làm mạng xã hội thú cưng mà thằng M$ có cái app what-dog.com khá là hay nên mình sẽ chọn dịch vụ M$ làm thí nghiệm trước. Nào hãy cùng bắt đầu viết code 🙂Trước tiên tôi cho là bạn đã biết căn bản PHP và Phalcon, nếu chưa biết Phalcon có thể xem tại đây trong Phalcon bạn có thể tùy biến tuỳ thích, thông thường tôi sẽ tùy biến nó như sau:Chú ý toàn bộ mã nguồn bạn có thể tải tại đây https://github.com/duythien/vision.lackkyTạo thư mục config chứa thông tin cấu hình kết nối cơ sở dữ liệu, các key secret được cung cấp bởi bên thứ 3…, ngoài ra trong thư mục config tôi cũng định nghĩa luôn loader cũng như service của PhalconTập tin config.php
define('VERSION', 'v1');
define('APPLICATION_ENV', (getenv('APPLICATION_ENV') ? getenv('APPLICATION_ENV') : 'local'));

return new \Phalcon\Config(
[
/**
* The name of the database
*/
'database'  => [
'mysql'     => [
'host'     => 'localhost',
'username' => 'root',
'password' => '',
'dbname'   => 'app',
'charset'  => 'utf8',
]
],
/**
* Application settings
*/
'app' => [

//The site name, you should change it to your name website
'name'  => 'Lackky',
'debug' => true
],

'vision' => [
'secretKey' => 'xxx-xxx-xxx-xxx-xxx',
'baseUrl' => 'https://api.projectoxford.ai/vision/v1.0/'
]
]
);
Tập tin loader.php:
$loader = new Phalcon\Loader();
/**
* We're a registering a set of directories taken from the configuration file
*/
$loader->registerNamespaces(
[
'Lackky\Controllers'  => ROOT_DIR . '/controllers/',
'Lackky\Models'       => ROOT_DIR . '/common/models/',
'Lackky\Auth'         => ROOT_DIR . '/common/auth'
]
);
$loader->registerFiles(['helper.php']);
$loader->register();


require ROOT_DIR . '/vendor/autoload.php';
Trong 3 dòng code đầu tiên thì tôi nạp file thông qua namespaces còn đoạn code $loader->registerFiles(['helper.php']) thì nạp file qua include vì trong file helper.php là các function nên điều đó là hợp lý, ngoài ra bạn để ý rằng có thư mục common, thư mục này thì thường định nghĩa các thành phần dùng chung cho các service khác, chẵn hạn như model, oauth, queue, mailler…Tập tin routes.php
use Phalcon\Mvc\Router\Group;
use Phalcon\Mvc\Router;

$router = new Router(false);
$router->setDefaults([
'controller' => 'images',
'action'     => 'index'
]);
$router->removeExtraSlashes(true);
$prefix = '/' . VERSION . '/';


$images = new Group(['controller' => 'images']);
$images->setPrefix($prefix . 'images');
$images->addGet('', ['action' => 'index']);
$images->addPost('/describe', ['action' => 'describe']);

//mount
$router->mount($images);

return $router;
Quy tắc đầu tiên của việc viết API là phải định nghĩa một version cho nó, trong Phalcon thì bạn chỉ cần set Prefix với version thông qua phương thức setPrefix, như ví dụ trên thì nó sẽ có dạng như thế này
http://vision.lackky.com/v1/images //Accepted GET  method
http://vision.lackky.com/v1/images/describe //Accepted POST method
Trong đó http://vision.lackky.com là domain của website bạn, kế đến chúng ta sẽ định nghĩa vài service như kết nối cơ sở dử liệu, cookie, router…,bên dưới đây là tập tin service.phpNói thì nói vậy thôi, chứ như ông lớn google code thần thánh API họ cũng có version nhưng thường sẽ không có prefix v1, v2 trên Url có thể họ ẩn trong header:)
use Phalcon\DI;
use Phalcon\Crypt;
use Phalcon\Security;
use Phalcon\Mvc\Router;
use Phalcon\DI\FactoryDefault;
use Phalcon\Http\Response\Cookies;
use Phalcon\Cache\Frontend\Data;
use Phalcon\Db\Adapter\Pdo\Mysql;
use Phalcon\Mvc\Model\Manager as ModelsManager;
use Phalcon\Session\Adapter\Files as SessionAdapter;
use Phalcon\Events\Manager as EventsManager;
use Phalcon\Mvc\Dispatcher;

/**
* The FactoryDefault Dependency Injector automatically
* register the right services providing a full stack framework
*/
$di = new FactoryDefault();

/**
* Register the configuration itself as a service
*/
$config = include __DIR__ . '/config.php';

if (file_exists(__DIR__ . '/config.' . APPLICATION_ENV . '.php')) {
$overrideConfig = include __DIR__ . '/config.' . APPLICATION_ENV . '.php';
$config->merge($overrideConfig);
}

$di->set('config', $config, true);

//setup timezone
//date_default_timezone_set($di->get('config')->application->timezone ?: 'UTC');

/**
* Router
*/
$di->set(
'router',
function () {
return include __DIR__ . '/routes.php';
},
true
);

$di->set(
'dispatcher',
function () use ($di) {
$eventsManager = new EventsManager;
//$eventsManager->attach('dispatch', new Acl());
//$eventsManager->attach('dispatch:beforeException', new NotFoundPlugin);
$dispatcher = new Dispatcher;
$dispatcher->setEventsManager($eventsManager);
$dispatcher->setDefaultNamespace('Lackky\\Controllers');
return $dispatcher;
}
);

/**
* This service controls the initialization of models, keeping record of relations
* between the different models of the application.
*/
$di->set(
'collectionManager',
function () {
return new Manager();
}
);
$di->set(
'modelsManager',
function () {
return new ModelsManager();
}
);


// Database connection is created based in the parameters defined in the configuration file
$di->set(
'db',
function () use ($di) {
return new Mysql(
[
'host'     => $di->get('config')->database->mysql->host,
'username' => $di->get('config')->database->mysql->username,
'password' => $di->get('config')->database->mysql->password,
'dbname'   => $di->get('config')->database->mysql->dbname,
'options'  => [
\PDO::MYSQL_ATTR_INIT_COMMAND => 'SET NAMES ' . $di->get('config')->database->mysql->charset
]
]
);
},
true // shared
);

$di->set(
'cookies',
function () {
$cookies = new Cookies();
$cookies->useEncryption(false);
return $cookies;
},
true
);
Sau đó tôi sẽ định nghĩa một file index.php trong thư mục public, chú ý rằng ta có thể đặt nó bất cứ nơi nào, nhưng tôi khuyên bạn nên đặt trong public vì chúng ta sẽ cấu hình Server Nginx hoặc Apache sẽ điều hướng vào thư mục public, để tránh các lỗi bảo mật cũng như trong cool hơn 🙂Ngoài ra sau này chẵn hạn bạn muốn thêm thư mục css, js, images thì cứ việc đặt trong public cũng hợp với logic cấu hình của một dự án PHP bất kỳ, không chỉ riêng là Phalcon PHPNội dung của tập tin index.php như sau
defined('ROOT_DIR') || define('ROOT_DIR', dirname(dirname(__FILE__)));

require ROOT_DIR . '/config/loader.php';

try {
require ROOT_DIR . '/config/service.php';

$router = $di->getRouter();
$router->handle();

// Pass the processed router parameters to the dispatcher
$dispatcher = $di->getDispatcher();
$dispatcher->setControllerName($router->getControllerName());
$dispatcher->setActionName($router->getActionName());
$dispatcher->setParams($router->getParams());
$dispatcher->dispatch();

// Get the returned value by the last executed action
$response = $dispatcher->getReturnedValue();
// Check if the action returned is a 'response' object
if ($response instanceof Phalcon\Http\ResponseInterface) {
// Send the response
$response->send();
}
} catch (Exception $e) {
echo $e->getMessage();
dd($e->getTraceAsString());
}
ở trên thay vì tôi sử dụng Micro Phalcon thì tôi dùng Full stack của Phalcon luôn có nghĩa là nếu bạn dùng Micro bạn sẽ không thể nào sử dụng hết tính năng của Phalcon, tôi thích như thế nên tôi cấu hình như thế, nếu bạn không thích thì chỉ việc thay đổi lại thôi. Sự khác biệt về tốc độ cũng không ảnh là mấy vì tôi đã cấu hình gần như là optimize khi dùng Full Stack Phalcon:)Mọi thứ gần như đã xong việc còn lại là bạn chỉ cần tạo một controler để xử lý request và response
<?php
namespace Lackky\Controllers;

use GuzzleHttp\Client;
use GuzzleHttp\Exception\ClientException;

/**
* Class ImagesController
*
* @package Lackky\Controllers
*/
class ImagesController extends ControllerBase
{

/**
* @return JsonResponse
*/
public function describeAction()
{
if (!$this->request->isPost()) {
return $this->respondWithError('Need provided a request post', 404);
}
$data   = $this->parserDataRequest();

$img = $data['img'];
if (!isset($img)) {
return $this->respondWithError('Need provided a resouce image url', 405);
}

$body = [
'url' => $img
];

$parameters = $this->getParameter();

if (!isset($parameters['maxCandidates'])) {
$parameters['maxCandidates'] = 1;
}

//Created client request
$client = $this->makeClient();

try {
$response = $client->request('POST', 'describe', [
'query' => $parameters,
'body' => json_encode($body)
]);
echo $response->getBody()->getContents();

} catch (ClientException $e) {
if (!$e->hasResponse()) {
return $this->respondWithError('We can not detected a error', 400);
}
echo \GuzzleHttp\Psr7\str($e->getResponse());
}
}

/**
* @return JsonResponse
*/
public function analyzeAction()
{
$data   = $this->parserDataRequest();

$img = $data['img'];
if (!isset($img)) {
return $this->respondWithError('Need provided a resouce image url', 405);
}

$body = ['url' => $img];
$parameters = $this->getParameter();

if (!isset($parameters['visualFeatures'])) {
$parameters['visualFeatures'] = 'Adult';
}

//Created client request
$client = $this->makeClient();
try {
$response = $client->request('POST', 'analyze', [
'query' => $parameters,
'body' => json_encode($body)
]);
echo $response->getBody()->getContents();

} catch (ClientException $e) {
if (!$e->hasResponse()) {
return $this->respondWithError('We can not detected this error', 400);
}
echo \GuzzleHttp\Psr7\str($e->getResponse());
}
}

/**
* @return Client
*/
protected function makeClient()
{
$vision = $this->config->vision;

$headers = [
'Content-Type' => 'application/json',
'Accept' => 'application/json',
'Ocp-Apim-Subscription-Key' => $vision->secretKey,
];
$client = new Client([
'base_uri' => $vision->baseUrl,
'timeout'  => 222.0,
'headers' => $headers
]);

return $client;
}
}
nếu bạn chạy đoạn code trên sẽ bị lỗi vì tôi sử dụng thư viện bên thứ 3 để handle request từ client đó là GuzzleHttp, do đó bạn cần cài đặt nó như mọi khi bạn nên cài đặt thông qua composer, chỉ cần chạy lệnh sau:
composer require guzzlehttp/guzzle
Sử dụng vision của M$
Có lẻ hiện nay có 2 ông lớn đó là Google và Microsoft cung cấp vision khá là bá đạo, tôi chỉ mới dùng Vision M$ do đó trong bài viết này tôi sẽ chỉ bạn cách dùng cơ bản nóTrước tiên bạn cần vào trang chủ đăng ký nó sẽ cung cấp cho bạn key để dùng, và nó free 5000 request đầu tiên, do đó tôi nghĩ đủ request để cho bạn test :), sau khi có key bạn chỉ việc đặt trong tập tin config.php
'vision' => [
'secretKey' => '1f5bf5e5f42844xxxxxxxc1b4ed6ed5',
'baseUrl' => 'https://api.projectoxford.ai/vision/v1.0/'
]
Cách dùng
Để biết một hình ảnh có phải là nội dung người lớn hay không bạn chạy lệnh sau để kiểm tra, để đơn giản tôi dùng CURL cho nhanh
$ curl -i -X POST -d '{"img" : "http://i.imgur.com/oCGSrlX.jpg?1"}' http://vision.lackky.com/v1/images/analyze
Kết quả sẽ có dạng như thế này:
HTTP/1.1 200 OK
Server: nginx/1.10.1
Date: Fri, 02 Dec 2016 04:37:53 GMT
Content-Type: application/json
Transfer-Encoding: chunked
Connection: keep-alive
X-Powered-By: PHP/7.0.11

{
"adult": {
"isAdultContent": false,
"isRacyContent": false,
"adultScore": 0.021811855956912041,
"racyScore": 0.12827226519584656
},
"requestId": "1c8ba242-871c-4d90-a35c-ad18abae65b7",
"metadata": {
"width": 1490,
"height": 2340,
"format": "Jpeg"
}
}
Nếu tôi gửi một hình ảnh người lớn thì kết quả sẽ khác
$ curl -i -X POST -d '{"img" : "http://anh-sex-vip.sextgem.com/anh-sex/anh-sex-maria-ozawa/hinh-sex-maria-ozawa-07.jpg?1"}' http://vision.lackky.com/v1/images/analyze
Kết quả sẽ có dạng như thế này
{
"adult": {
"isAdultContent": true,
"isRacyContent": true,
"adultScore": 0.9939771294593811,
"racyScore": 0.972011387348175
},
"requestId": "840ea764-0a4d-48e1-9250-694519f23c71",
"metadata": {
"width": 768,
"height": 1024,
"format": "Jpeg"
}
}
Muốn xem chi tiết của một hình ảnh bạn có thể dùng lệnh như thế này
$ curl -i -X POST -d '{"img" : "http://i.imgur.com/oCGSrlX.jpg?1"}' http://vision.lackky.com/v1/images/describe
kết quả nó sẽ trong như thế này
{
"description": {
"tags": [
"person",
"outdoor",
"grass",
"tennis",
"holding",
"sport",
"game",
"racket",
"standing",
"woman",
"player",
"wearing",
"court",
"ball",
"top",
"ready",
"hand",
"shirt",
"girl",
"female",
"red",
"young",
"field",
"baseball",
"pink",
"blue",
"playing",
"white"
],
"captions": [
{
"text": "Maria Sharapova holding a tennis racket",
"confidence": 0.85283775631279934
}
]
},
"requestId": "84b43cba-ef70-41a0-bddf-b99cc16401bd",
"metadata": {
"width": 1490,
"height": 2340,
"format": "Jpeg"
}
}
Việc làm kế tiếp(TODO)
Tất nhiên là phải viết test case để đảm bảo API cung cấp đúng đầu ra, có thể dùng codeception hoặc behat cho viết test, tiếp đó là viết tài liệu về microservice này cũng như Refector code cho nó đẹpChỉnh lại định dạng output của API sao cho phù hợp với nhu cầu sử dụng của chúng ta, điều này đồng nghĩa với việc cho dù sau này bạn có dùng Vision API của bất kỳ thằng nào thì cũng chả sao cho các ứng dụng của chúng ta khi sử dụng Microservice nàyNgoài ra chúng ta cần phải cấu hình để bảo vệ data API này chỉ cho phép resource bạn chỉ định có thể dùng nó mà thôi
Kết luận
Cảm nhận của tôi liệu cái ứng dụng này có phải được gọi là microservice, theo sự cảm nhận thôi nhé thì một microservice thì chỉ cung cấp một tính năng duy nhất, và có thể fix hay refactor code không dưói 1 tuần làm việc, với tiêu chí này thì toàn bộ đoạn code này chỉ mất 1 ngày để viết cũng như fix, vì vậy kết luận của tôi là nó là một micro service 🙂Để hiểu rõ hơn API Vision của dịch vụ M$ cũng như cách tích hợp nó vào API của mình thì bạn có thể đọc thêm tại đâyBạn nào có kinh nghiệm về nó thì hãy chia sẻ, hoặc thấy bài viết mình còn thiếu sót gì thì cứ góp ý, như mọi hôm hãy share và like nếu thấy phê !!!